Featured Free Software

Showing posts with label Radio Shark. Show all posts

Thursday, March 12, 2009

Icecasting with Ubuntu and Radio Shark

Lately, I've really been geeking out on Ubuntu and a radio tuner device my kids bought me last year called a Radio Shark. This is the 3rd installment of a series of tutorials on how to get the Radio Shark to function in Ubuntu Linux. The device was actually designed for MAC and Windows, but some serious Linux users have found ways to make it work with Linux. In my endeavors to get Ubuntu at least as functional as Windows on my dual-boot laptop, I've included these instructions in case anyone else out there is trying to similarly get all their devices working. To learn the basics of getting RS to play and record, see my last 2 posts. This post will be a little more advanced, in that we will set up Ubuntu to stream the RS output on the web as an audio stream. Yeah, cool eh? Stream your favorite local radio station to anywhere on the net...

**Updated March 23, 2009 for iPhone/iPod player info...see below

First, check out the previous 2 posts, here and here, to get the background needed to get RS functional in Ubuntu (at least enough to play). If you just want a quick tutorial on streaming via icecast and darkice in Ubuntu, you could use this as a quick guide, but there's a ton better on the web (i.e. search for "how to use icecast").

Step 1: Open Synaptic Manager in Ubuntu and do a search for "icecast"


Select icecast2, and darkice packages and accept all supporting files when Synaptic auto-adds the required files, and then install them.

Step 2: Setup icecast.xml (/etc/icecast.xml), by opening in your favorite editor. It's important to configure all the authentication sections, especially the default passwords that are all set to "hackme". You also need to set your actual <hostname> value to your computer name. See some examples below:

<authentication>
<!-- Sources log in with username 'source' -->
<source-password>SomePassword</source-password>
<!-- Relays log in username 'relay' -->
<relay-password>SomePassword</relay-password>

<!-- Admin logs in with the username given below -->
<admin-user>Barney</admin-user>
<admin-password>SomePassword</admin-password>
</authentication>


Step 3: Setup darkice. Touch a file into the /etc directory called darkice.cfg, and edit the values for your configuration. I provided an example of mine below:

[general]
duration = 0
bufferSecs = 5
reconnect = yes

[input]
device = /dev/dsp1
sampleRate = 22050
bitsPerSample = 16
channel = 2

[icecast2-0]
bitrateMode = vbr
format = vorbis
bitrate = 32
quality = 0.8
server = localhost
port = 8000
password = Somepassword
mountPoint = example-complex.ogg
name = The Eagle
description = Classic Rock
url = http://home-laptop
genre = misc
public = yes

Step 4: Tune the radio shark, start icecast2 and darkice. In the terminal console enter the following commands (or add a bash script that does this):

$ sudo shark -fm 106.9
$ sudo /etc/init.d/icecast2 start
$ sudo /usr/bin/darkice -c /etc/darkice.cfg


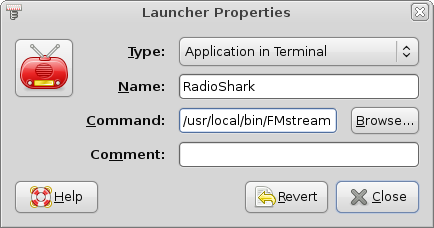
In my case, I tweaked the earlier posted FMstart script and launcher shortcut to include the streaming commands instead. You could also simply initialize the icecast service on startup, run your script, or use cron to execute your scripts at preset times to play, stream or record when you like.

Step 5: Check that icecast/darkice is presenting your stream by navigating to your server's address using Firefox: http://localhost:8000. You can also monitor your streams/listeners here...


Step 6: Allow Clients to access your streaming server

NOTE: In this example, I provide a simple way to stream music on your home network. It could work similarly on a front-facing internet server, but I do not include the specific steps to do this. Properly configuring firewalls in Linux is well beyond the scope of this writeup, especially to protect resources on the internet. If you run the built-in Ubuntu firewall (iptables), you can use "firestarter" GUI to tweak it to allow it to allow local traffic easily, otherwise your clients will likely not see the stream.
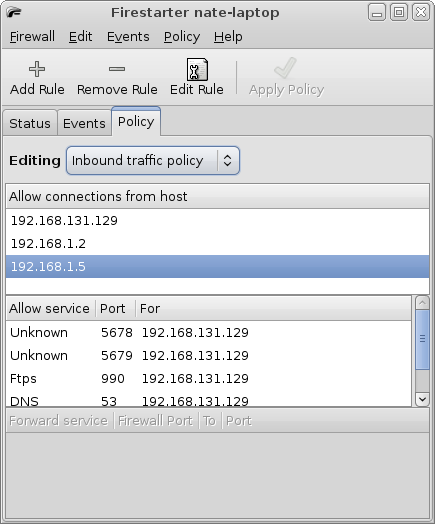

I simply set it to allow clients on my home network (192.168.1.0 private network address), but a more involved configuration is required if you use, for instance, NAT (network address translation) to protect your internal addresses and wish the streams to be allowed across the internet. You could allow incoming connections to port 8000, for example, but you should consult security documentation thoroughly to understand the risks of exposing any home computers to outside users in this manner.

Step 7: Play back your streams. In my case, I used the excellent, free TCPMP (The Core Pocket Media Player...Windows versions of this great A/V player are also available) running on my Windows Mobile device, as I find it plays almost any type of media. In this case, the stream is formatted as ogg-vorbis--and presented as a SHOUTcast stream--not every player can natively play this kind of stream. Tuning in should be as easy as connecting to your home network via Wifi and inputting the full URL into your player...i.e. http://yourserver:8000/example-complex.ogg


Supprted players include (from the icecast homepage) below. To learn more about icecast and darkice go here and here...
foobar2000 (mp3 + ogg vorbis) Windows 98/NT/2000/XP http://www.foobar2000.org
winamp 2.x, 5.x (Not 3.x)(mp3 + ogg vorbis) Windows 98/NT/2000/XP http://www.winamp.com
XMMS(mp3 + ogg vorbis) Unix http://www.xmms.org
Zinf(mp3 + ogg vorbis) Unix/Windows http://zinf.sourceforge.net
MPlayer Windows 98/NT/2000/XP Unix Mac OSX http://www.mplayerhq.hu
Xine Unix http://www.xinehq.de
VLC Windows 98/NT/2000/XP Unix Mac OSX http://www.videolan.org

In an earlier post, I admitted that I didn't yet have an elegant method to time-shift the RS using Ubuntu, but using icecast/darkice to stream does allow you to control this in a similar fashion. In TCPMP, for example, you can pause the live stream for several minutes, like say during commercials, so that you lag the live radio trasmission. You could then fast forward through that section until you have again caught up to live input again. It's not as nifty as the Windows software capability that comes with the RS, but it serves. Well, that's pretty much it for Radio Shark and Ubuntu for now. Next time, I hope to have worked out an effective scripting method for doing real time-shifting, so be sure to check back again.

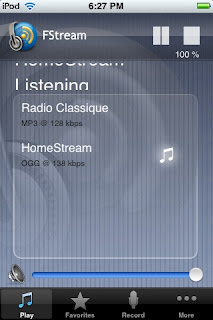
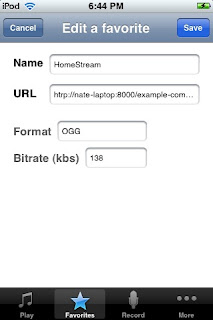
Actually I discovered a player for iPhone/iPod Touch that will play SHOUTcast streams, and works quite nicely with this setup called FStream. You can download and use it for free by searching for the name in iTunes or the device App store. Once installed, simply add your URL stream as a favorite, and select that stream in the main screen to play. You can tweak a setting that will allow you to time-shift when pausing just as with TCPMP mentioned above (look in the More menu). You can also record streams with this tool.


Credits:

Sources (Bibliography/credits):

How-to stream cast with RS by Javier Rodriguez: http://javier.rodriguez.org.mx/index.php/2006/06/10/griffin-radio-shark-icecast2-on-debian-gnulinux

How-to Play RS on Deb Linux by Javier Rodriguez: http://javier.rodriguez.org.mx/index.php/2007/05/20/use-the-radioshark-2-under-linux-shark2c

New RS 2 code by Hisaaki Shibata (on Javier’s site): http://javier.rodriguez.org.mx/code/shark2.c

Original RS Linux how-to and shark.c: http://wiki.linuxquestions.org/wiki/Audio …code by Michael Rolig

Good example of using Linux to record, play and time-shift using RS: http://whats.all.this.brouhaha.com/2006/01/18/radioshark-in-linux/

Web-site that allows you to control a real live RS tuner over the net: http://www.radioyakima.com/index.php

Friday, February 06, 2009

Record and Play from Radio Shark in Ubuntu Update


I found that there are actually easier ways to play (and record) music from the Radio Shark 2 in Ubuntu (versus using ecasound...see the full previous post here). You can use arecord/aplay (built-in command-line sound programs in Linux). You will still have to follow the previous instructions on installing libhid. To use arecord/aplay, open a terminal as described in the previous post, and enter the following:

$ arecord -c 2 -f dat -D hw:1,0 | aplay -D hw:0,0

Record 2 channels using "dat" format from Radio Shark, and then send the recorded output to aplay via your PC sound card (so you can actually hear it).

You can also wish to simply record directly to a file for later consumption, so you can do this instead:

$ arecord -c 2 -f dat -D hw:1,0 foo.wav

This says to record as before, but to a .wav file called "foo"

Then play the file using aplay:

$ aplay foo.wav

To record to an mp3 file directly, you need to install lame (see instructions in previous post on how to install using Synaptic). Search for "lame" in the package manager to find and install. Then you can use the following command to directly record to mp3.

$ arecord -c 2 -f dat -D hw:1,0 | lame - sample.mp3

Same as above except the "|" (known in UNIX parlance as a pipe) now "pipes" the arecord output to lame, which reads from standard in (in this case the previous command's output) and converts/stores the audio stream into an mp3.

So you can replace the ecasound command in the previously posted bash script with the ones above you would like to use instead. Maybe have 2 bash scripts; one for recording and the other for simple playback.

You will notice that you can't do real-time audio shifting and simultaneous recording using only the methods I have posted here. This is a hangup if you really want to use the Shark to make your own mp3s quickly and easily. I must recommend the Windows version for that, as the time-shifting features allow you to go back to a point in the broadcast where, say, a song starts, and then start recording from there. You can also listen while recording and stop it when the song ends, but even the Windows option is not as easy as it once was. The excellent SnapTune service is no longer available, which could automatically tag and save the songs from the radio stream (into mp3s). Still, it is progress for Linux users who might have an RS 2, and don't need another paperweight on their desk. For instance, if you want to record talk radio programs (instead of songs), then you can easily set up a cron job in Unix to start/stop your scripts at preset times/days, but this is getting into more advanced topics. Stay tuned for the next post. Now that we can at least play, and record using RS and Linux, I will post on what else there might be for this cool audio gadget.


Saturday, January 17, 2009

Radio Shark 2 running on Intrepid Ibex

UBsharkNew Ubuntu Linux has become my current hobby shop. I finally concentrated on fixing some of the more egregious problems I’ve been having with the latest Ubuntu stable release (playing DVDs and music). So now, after much tweaking, I finally have gotten my Radio Shark 2 AM/FM tuner to play in Linux on my laptop, though it was not exactly simple to track down all the required and various information. I figured after all the rabbit holes I went down (like compiling libhid from scratch) to get this to work, it might help to have an updated one-stop for the next poor sot, so I created this “kind of” simple how-to to get your RS2 at least to play in Ubuntu Intrepid. I’ll follow it up with a second post on some more advanced things you can do, like stream radio on your home network. Some very simple compiling of source code is involved and I added basic bash scripts at the end to start up the Radio Shark application. If you follow the step-by-step, it shouldn’t be a big deal (even for a relative noob). There are some cool things I learned in the process. If you are wondering why you would want to play live radio through your computer, read this. Say you want to make decent quality CDs/mp3s of the local classic rock station? I might know someone who has a collection of several hundred songs ripped to an iPod that was recorded this way—uh not me, of course. The powers that be might decide that radio is also copyright protected, and send out the black helicopters…

RSappWin It is the essence of true geekiness to be able to play and record radio through your computer. It gives your PC that final touch as a true media server, but it’s also useful to be able to stream live radio wirelessly on your home network (come back for the next post, or continue to the bibliography/credits at the bottom for those instructions). The standard Windows application/drivers for the RS allow you to listen/tune, time shift (like Tivo) and record live radio, which is still cool, no doubt (yawn), but check out this web-site to see what you could do with a radio tuner, and a computer…uh huh—geeks started their own home-grown internet radio station with a web server, some flash and a sprinkling of PHP. Now what you got to say, huh!? You can also do twisted stuff like make the shark’s lights change colors (living on the edge now, eh?) I’ll provide some links of places where you might find a Radio Shark. In this first post, I’m just going over the steps to allow you to play and change the stations, etc.

ubuntulogo

1. First, you need Ubuntu Linux on your computer. If you have Windows, it’s really quite easy to install Intrepid as a second boot option by following the install wizard. Read this for a very simple example, or do a search on-line for “Install Ubuntu”. Linux can be a pain, but it starts/runs/stops faster than Windows Vista. If you simply want to record/listen to music, the RS tuners come with Windows applications included that do this already (Windows users can stop reading now).

2. Second, you need a radio tuner device. In my case, I used the Radio Shark 2, (kids got mine at ThinkGeek.com). The RS is an external USB attached AM/FM tuner. I should think you could do this with other tuner devices, but will likely require you to customize or write new code.

3. Connect the Radio Shark with Linux running. (Open a terminal console (Under Applications >> Accessories) and type “dmesg” to view system log messages. You should see something like below indicating that the RS is connected to your computer and Linux isn’t throwing a fit:

dmesg log trace…

[ 296.877223] input: Griffin Technology, Inc. radioSHARK as /devices/pci0000:00/0000:00:1d.7/usb5/5-4/5-4.2/5-4.2:1.2/input/input13
[ 296.893339] input,hidraw2: USB HID v1.00 Device [Griffin Technology, Inc. radioSHARK] on usb-0000:00:1d.7-4.2
[ 297.157074] usbcore: registered new interface driver snd-usb-audio

Download, Install and configure the code:

Screenshot-Software Sources

4. Open Synaptic Package Manager (System >> Administration >> Synaptic…), and make sure the “universe/multiverse “ repositories are available (see above). Enable them, if need be--the extra goodies make Linux truly excellent--under “Settings” >> “Repositories”… Go here to learn more about Synaptic, which will make Add/Remove in Windows look like a bad joke.

Screenshot-Synaptic Package Manager 5. You will need the libhid development library, so do a quick search for libhid (search box is at the top of Synaptic), and the manager will reveal those packages (libhid-dev and libhid0). Don’t be intimidated just because it’s called a “library”—Synaptic does all the heavy lifting—it’s point and click just like Windows!

6. Select and install libhid packages (your source code will not compile without these). Synaptic will download and ask you to select required packages. Go have a tea…depending on you network speed.

Screenshot-Synaptic Package Manager -1 7. You will also need the program ecasound (also search the repository and repeat as you did for the libhid). This is the actual player program that I used. Go have another tea…

8. Download shark2.c from here. When it finishes, it will probably be downloaded to your user home directory under “Downloads” by default (in Firefox). The shark program allows you to change bands/tune the RS, and control the lights on the side.

9. In the console window you previously opened, type the following (followed by the enter key after each line):

# cd ~username/Downloads

…change directory to wherever you downloaded the source. Replace “username” with your username of course…

# sudo gcc -g -o shark -lhid shark2.c

…compile shark2.c! gcc stands for gnu compiler collection… You are now only like “this” far away from being a coder yourself (if “this” was years and years of experience writing computer programs, haha…)! When some uber-geek sneers at you, just say…”Lay off dude… I’ve compiled code before”

# sudo cp shark /usr/local/bin

…copy the code to the local user executable directory. This is mainly so that you AND your dog can now run the new shark program.

# sudo /usr/local/bin/shark –blue 60

…change the color of the lights to test if the code is working.

# sudo /usr/local/bin/shark –fm 106.9

Tune the shark to a local FM station in your area (106.9 is classic rock station near me). Cool, now we want it to actually make the radio play, right?

Running ecasound to play the RS:

Screenshot-Terminal

10. This part is a little more complicated. Like your new shark program, ecasound runs from the command line. So you could just pound in the word ecasound at your terminal console like the previous commands, but WAIT just a minute. You have to give it some extra input parameters. Oh my God! What in the seven hells are “input parameters”, you say!? Nothing big, just extra config information/instructions for the program when it starts up is all. You were already using them in the previous commands for gcc, shark, etc.

11. Type this next command instead (some tweaking may be required):

# ecasound -D -f:s16_le,2ch,48000,inter-leaved -i:/dev/dsp1 -o:/dev/dsp -B:nonrt -z:db -b:4096

This tells ecasound to run with debug on and specifies the sound IO device and buffer settings. Mainly, you want to focus on the sample rate of 48000, and tweak this for better performance or sound quality (and maybe if you have issues). I've seen that other users have successfully used 6400, 8000, and 32000 as well. The higher the sample rate, the better the audio quality that is produced. My RS made a pretty nasty sound at 8000. 48000 sounded great for FM playback.

Automating your Radio Shark in Ubuntu
12. While you could continue to run programs and control devices using old-fashioned command prompts, you might want to take advantage of the more automated capabilities of having a modern computer. So, make a script and a shortcut to easily execute your Radio Shark commands from the Gnome Application Launcher. I like to use VI editor for basic file editing, but you can use your favorite text editor (say gedit which is like notepad). First create a launcher script and then some change station scripts. Use your Terminal console again:

# cd /usr/local/bin
# sudo touch FMstart FMST1

..creates the empty script files..you can create more for fav stations like FMST2, FMST3... etc.

# sudo chmod 755 FM*

..makes them executable so users like you AND your dog can run them

Script contents:

Navigate using Gnome file browser to /usr/local/bin. Save these script contents in the files that you created earlier. Open the files with your editor:

FMstart:
#!/bin/bash
#first line says I'm a bash script
#Second sets RS with my favorite station
#Third turns on the sound and then exits when you stop it
sudo shark -fm 106.9
ecasound -D -f:s16_le,2ch,48000,inter-leaved -i:/dev/dsp1 -o:/dev/dsp -B:nonrt -z:db -b:4096
exit 0

FMSTN1 (change the freq to a local one in your area):
#!/bin/bash
shark -fm 106.9
exit

Full list of shark commands:
-fm <freqeuncy> : set FM frequency, e.g. '-fm 91.5'
-am <frequency> : set AM frequency, e.g. '-am 730'
-blue <intensity> : turn on blue LED (0-127) '-blue 127'
-red <0/1> : turn on/off red LED '-red 1'

13. Add Application shortcuts to the Gnome panel or the Programs Menu to run your new custom scripts. For instance, you can add the shortcut to the Sound and Video category under the main Applications folder. Simply right-select the Gnome launcher (see below):

PanelEditSelect the Add new item button, and select the “Custom Application Launcher” choice at the next dialog…

Screenshot-LauncherProperties

In the Launcher Property window, enter the application name you want to assign and the path to your executable script. You can also assign a suitable icon for your program.

Issues:

Make sure you go into the sound settings in Ubuntu and turn up the correct sound device to hear the radio playback. You can tweak volume levels from the main menu volume control, or by navigating again to the system settings menu. You may need to unplug and plug back in the RS, and rerun the ecasound and shark scripts if you booted with it already plugged in.

Feel free to post your comments. I added links to the source material below, and would like to hear more awesome ways you use Linux. Next post, I’ll add more RS and Ubuntu tips…

Sources (Bibliography/credits):

How-to stream cast with RS by Javier Rodriguez: http://javier.rodriguez.org.mx/index.php/2006/06/10/griffin-radio-shark-icecast2-on-debian-gnulinux

How-to Play RS on Deb Linux by Javier Rodriguez: http://javier.rodriguez.org.mx/index.php/2007/05/20/use-the-radioshark-2-under-linux-shark2c

New RS 2 code by Hisaaki Shibata (on Javier’s site): http://javier.rodriguez.org.mx/code/shark2.c

Original RS Linux how-to and shark.c: http://wiki.linuxquestions.org/wiki/Audio …code by Michael Rolig

Good example of using Linux to record, play and time-shift using RS: http://whats.all.this.brouhaha.com/2006/01/18/radioshark-in-linux/

Web-site that allows you to control a real live RS tuner over the net: http://www.radioyakima.com/index.php

Saturday, June 23, 2007

Radio Shark 2, a TiVo for your Radio...and more


My kids are awesome. They bought me a new computer/radio toy (the perfect mix) for Father's Day. OK, I know, I know...I'm a geek, and radio is boring, but WAIT!!! ...here's a taste of the radio-control prowess I now posess via my meager computer: I can pause and rewind live radio with the Radio Shark (I dont mean herky-jerky Internet radio stations either, I mean FM/AM stations in real-time), just like TiVo--if I want to hear a song again, I just hit rewind. RadioShark records on my computer (constantly in the background) just like the original, and I can move back and forth through the stream or return to the live broadcast. Second reason I love it...I can let radio Shark record away for hours and hours, and it will go back at intervals and sift through the data it has recorded and analyze it. It looks for the song patterns that real music will produce in the stream and isolates them, and converts them to mp3s. I can download the songs to my iPod, throwing out the commercials and DJ blather--and, if the FM station is trasmitting song ID tags in the FM transmission (some stations are now doing that), I even get all the song information as well (or input it manually).

Recording with SnapTunes

Wait!!! ...There's much more!! Radio Shark's software (which you guys can also download for free called SnapTunes One) even works with Internet Radio, and will search out songs and programs the same way as on regular radio, and guess what? It even supports line-in recording, so you can use your own radio tuner with it. Yep, that's right...you don't even need a Radio Shark. Simply connect your radio tuner to the line-in port on your sound card in the back of your computer. Tune in a radio station and start recording with SnapTunes, and walk away and leave it go for several hours. It may take a few days of experimenting for it to find the pattern in your local stations, but eventually it will learn. The quality isn't as high as a CD, but it's exactly as good as the original radio station reception (which is good enough for stereo quality).

RadioSHARK 2 Features

# RadioSHARK 2 gives you control of how and when you listen to your favorite radio shows.
# Record any AM or FM radio broadcast
# Record what you are listening to at the moment or set the RadioSHARK 2to record at a specific date and time
# Allows time-shift recording to "pause" live radio, although this recording cannot be saved as a file. The audio is kept in a temporary space on the hard drive for playback.
# Records in AAC, MP3, WMA, and AIFF files
# USB connectivity
# Mac and Windows compatible
# Software for both platforms is included