Featured Free Software

Showing posts with label Ubuntu. Show all posts

Friday, July 09, 2010

Ubuntu Sound and Power Glitches


Well, I am always singing praises about Ubuntu Linux, but recently my netbook started glitching on a few things. One I noticed is that the power manager is erroneously shutting down my netbook when I remove the power plug (thinks the battery is critically low, even though it is full). The battery monitor works fine if I start the netbook without external power. I've tried tweaking settings using "sudo gconf-editor" (under apps >> gnome-power-manager), but have not been able to stop the issue. The second problem I have found a workaround for so if you notice that your Linux sound stops working, you might try this (there is a good sound t-shooting tutorial here by the way). Use the following commands shown below and your sound should start again (I added them to a simple bash script). That is, if you have the same exact issue with Lynx. The aplay -l output shown above might be a clue. It does not show anything when sound stops working in my case...

#!/bin/bash
killall pulseaudio
sudo alsa force-reload
pulseaudio -D

Add the first line above only if you want to use it in a bash script like I did (save it using gedit with .sh extension, and make executable). Otherwise simply run the commands one at a time in a terminal window. I dug them up on one of the many Ubuntu user forums I had to google through, and give a hearty thanks to whoever posted them up.

Friday, May 21, 2010

Ubuntu 10.04 LTS Lucid Lynx is...WOW!


I upgraded my portables this past weekend to Ubuntu 10.04 LTS. I have an old HP tc tablet computer, and a newer netbook. Ubuntu just gets better and better. I plugged in my iPod touch, and not only was it recognised and mounted, I could play all my DRM-free tunes through Rythmbox, transfer pix automatically using F-Spot, and browse the iPod's filesystem. I did this without jailbreaking anything... Seriously, I don't understand why anyone would not want to grab this easy-to-use and full featured Linux distro! If nothing else, download and try the WUBI install version... It installs inside Windows, just like any application...

Thursday, February 18, 2010

Ubuntu Running on HP TC1100 TABLET

tc11002 At CES this year I saw one gadget I really loved and it is not new. In fact it is an old HP tablet model tc1100. Evidently Hal, our editor over at smartphonemag.com got a bunch of these for re-sell, and brought one to the show. They are old tech, and many are not in very good shape, but I have wanted one of these for a long time. Hal and Thaddeus sent me one after the show to play around with. The unit is badly scratched and wouldn’t boot up properly about half the time, and the battery is not holding a charge very well, but hey it still mostly works! I had it connected to the internet in about 5 minutes after it arrived.

The HP tc has a swivel base keyboard, but that doesn’t work at all on this unit. I tried updating and patching the default XP install that came installed, but it started hanging pretty bad after startup, and Windows update was complaining about install failures. It went from slow to snail-speeds. I finally had enough, and decided to slap Ubuntu Linux on it. I also removed the keyboard completely, so now it is not too far removed in capability from a low-res iPad. Though it’s been around the block and back, it’s running Karmic Koala now very nicely, and has stopped having boot issues. Check out some demo vids below…

Playing one of my fav free games--Scorched Earth, runs really pretty well on the tc1100, even with only 512MB of RAM. Scorched was a bear to shutdown though…

A general demo of the main apps that come with Karmic…chat, view pix, videos, handwrite notes and listen to music (that’s the excellent free magnatune service).


The latest Ubuntu full desktop release has some nice graphic enhancements (which don’t work with my netbook because of compatibility problems), but work just fine on the tc. There were mucho tweaks of course (wouldn’t be Linux without that), but this post helped alot. If you have not experienced the magic of the easiest to use (and master) Linux release freely available, then you don’t know what you are missing…Thanks, Hal, Thaddeus and especially Linux. Next on the list is to find a newer battery…

Sunday, November 08, 2009

A Tale of 2 Upgrades

Versus2

This weekend was a weekend for upgrades. I’ve been running Windows 7 now at work (much like every other geek), for months now. Love it!. Can’t be any clearer than that. It is the XP of Vista. Anyhoo, I figured I would make it a party and upgrade not just my dual-boot Vista laptop, but also my dual-boot Ubuntu Netbook. What I mean is that I performed 2 very different side-by-side “upgrade installs”--not fresh installs of the next version, but an actual upgrade--of VIsta to Win 7, and Ubuntu 9.04, to 9.10 “Karmic Koala” (latest version has cool features worth having, even if the name is weird). It was double the fun, of course, but why can’t MS tone down the reboots…? I didn’t think it was ever going to finish copying files and rebooting my computer (I lost count at like 4 reboots)...and it’s 2G in size! The lean and mean Ubuntu network upgrade (only a few hundred MBs) was a comparative dream and also polite enough to wait until finished upgrading to reboot.

Versus3

I’m trying to keep the focus here on my Ubuntu experience, but if you want to know all the gory details on how painful the Vista to Win7 upgrade actually is, you can read about it on my other blog. I must give homage to both the excellent software designers behind Win 7 (and Vista), as well as the incredible open-source community behind Ubuntu. Both upgrades were (so far), a complete success. Success being defined by both machines working normally under the new operating systems, and my previous programs and settings being satisfactorily preserved. There are some limitations to both upgrades, meaning that not every program/executable will make the transition in either case, and I have to give the Vista-to-Win7 a slight edge in this regard for being more helpful. Suffice to say, most of the obsolete packages that didn’t make the cut in the new version (at least in my case), will not be missed. The Win 7 upgrade process has a helpful upgrade advisor, and it makes the preparation ramp-up more intuitive, IMO. Ubuntu came to 2 points where I was left scratching my head, and one of them actually caused an error, which also has me wondering. Vista had no problems at all, and other than a plethora of reboots and program removal actions required by the user, ran without a hitch. Many of the screenshots I snagged from on-line tutorials, etc. I didn’t take many during my process, but it should give you an idea of what to expect though.

LinUp

Ubuntu 9.04 to 9.10 could not be simpler. You run the upgrade advisor, select any updates that might be available for your current release, and apply those first. You should see the selection that indicates that an upgrade is available. Select the upgrade (then Start Upgrade), and the rest is fully automated (for the most part). In my case, I was running the netbook remix of Jaunty under 9.04, and it began the process of preparing for the download and install of over a thousand or so packages, including the new Linux 2.6.31-14 kernel image. In the case of my netbook (which is exact opposite from the Vista config), I use grub for bootloader operations to be able to choose either XP or Linux during boot. Vista has a boot manager that makes running Linux in a dual-boot like this a turn-key proposition for practically anyone.

Screenshot

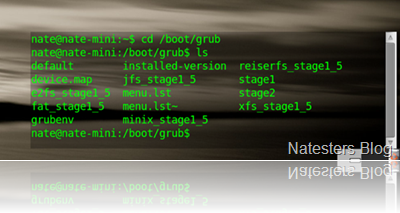
Naturally in both cases (Vista or Ubuntu upgrade), I was worried about this process hosing my boot sequence (neither did, actually), so before I upgraded either releases, I made sure I had good backups of my critical files, etc. and a copy of the boot config especially. In Ubuntu’s case I always keep a copy of menu.lst (look in the /boot/grub folder) somewhere on the computer in a safe place. This file (if it gets messed up), can mean the doom of booting into either XP or Ubuntu operating system, so I try to keep a back up available (of course, you can always re-install grub). If you have ever edited your menu.lst (for instance cleaned up all those old kernel boot paths), you will definitely be prompted by a confusing message toward the end of the upgrade asking you whether to keep the current version of it, or to replace with the latest version (I chose to upgrade it). The default option selected is to keep the current version. A couple of the options in the pull-down menu don’t change anything but will open a diff showing the entries that will be affected in menu.lst. There is also an “experimental” option that will allow you to meld the existing and new files together. In my case, I have a simple dual-boot configuration, and after going on-line and investigating, I decided to replace mine with the latest, and everything worked fine.

Upd2PartialUpgrade

During the prep stages--I must have missed exactly when because I didn’t note it until the downloads had begun--the upgrade had singled out several packages that were deemed un-upgradeable, and a prompt had appeared to start a “Partial Upgrade” instead. I must have missed it--I was throwing darts while doing the upgrades (in between screen prompts and reboots), because watching a computer upgrade itself is about as interesting as watching the grass grow. I selected the partial upgrade confirmation which seemed to start another update process, but that quickly errored due to locking issues (makes sense if an upgrade is already running). Basically, I think the Windows process is better here. The Win 7 upgrade script prompts you to manually un-install affected programs at the very beginning (of course you can ignore this and upgrade anyway). In the case of Ubuntu, I was lucky. I don’t have many custom packages installed to worry about, so I probably won’t notice the ones that were removed. My other Ubuntu laptop is still at Intrepid however for this reason (I have many programs and even a few self-compiled ones). I would have been mad about inadvertently messing up those programs because of a missed prompt.

ubuntuspl

The whole upgrade process took approximately 60-90 minutes depending what you consider part of the upgrade. Ubuntu takes a little while starting and configuring itself the first time, so technically the actual upgrade part was probably a little over an hour, at the most, though I didn’t actually time it. Considering that Win 7 took 3-4 hours in prep work (defrag, uninstall programs, etc.), and then some 2-3 hours for just the upgrade, I would say that’s pretty darn good in comparison. The Ubuntu install is free, and I can’t really complain too much about Windows 7 at $49.99 (Home Premium upgrade price). Vista came with the Gateway laptop computer that I bought used from a co-worker, which was a pretty good deal really. In terms of overall performance though, Ubuntu 9.10 in my early impressions is getting so-so marks. Win 7 is zippy by comparison on my laptop. Of course the hardware is greatly different in performance characteristics (particularly processor), but it is obvious the newer gnome desktop and underlying additions are taking their toll over the previous very snappy Netbook remix version. Win 7 has markedly improved my laptop computer’s performance over Vista (especially the boot time), but then part of the problem may have been with Windows Live OneCare and not all Vista’s fault. I am glad to report that in both cases, my computers retained the previous configurations for network connections, files, and folders from the previous version. My Win 7 machine did not retain my shared printer, or the mapped Windows Media library I have loaded on a desktop XP machine I have in the basement. I also had to force a reconnect of most of the network-connected services between my machines.

UbuntDesk1

I was mostly going to consider the install aspects in this post, but this release has this superlative new beta cloud service called Ubuntu One I couldn’t help talking a bit about. It is a surprising jump forward for Linux distros like Ubuntu. Really everything about this release is pretty amazing. The new gnome desktop is very nice, and certainly a few new, more polished apps have appeared (like the new Empathy IM client). There are a bunch more great advances underneath as well. Ubuntu One is interesting, because it’s a big bold step in both the Google and MS back yard of enterprise cloud services. The new old “thing” that’s being bandied about by everyone is any kind of “cloud-based” anything. U One adds a network drive (probably a web folder) to your places area. I had a few glitchy sort of issues with it. The file I added (through Ubuntu places folder with a simple drag and drop), would not download on other web-based clients (apache proxy errors on the web servers). After I let it sit for awhile, it then worked, so maybe they need to work on the “services” aspects of the back-end (or maybe they were just doing some maintenance). It is a beta after all. The service will also let you sync up Tomboy Notes, and Evolution Contacts. I like the new version of “Karmic”, but am a little concerned at the slight performance hit. Especially considering Ubuntu is usually faster than Windows. To learn more about upgrading Ubuntu to 9.10, go here.

Saturday, May 23, 2009

Ubuntu Linux Jaunty running on HP Mini-Note 2133

remix 

I recently acquired an HP netbook (mini-note 2133). The unit comes with XP pre-installed, which is kind of okay, but still a bit sluggish (it’s Windows after all). Of course, I had to install my other favorite operating system in a dual boot (no not Vista, though I considered it). The Jaunty remix is a quick install option for netbooks, but not nearly as turn-key as using the regular install method with Vista, and there are major issues lurking…noobs beware!

HPIM0450

Ubuntu installer boot options…

Most netbooks lack an internal CD/DVD drive, so the usual method of download .iso file, burn .iso, and then boot to .iso file is not so easy on a netbook. Again, Ubuntu impresses with it’s lightweight requirements, and flexible install methods. One can run the Jaunty Jackelope remix from a USB stick…What do you need to install Ubuntu Netbook Remix you ask (from the DL page..see below)?

  • A 1GB USB flash drive (aka thumb drive)
  • An Intel Atom processor
  • At least 384MB of RAM
  • Learn how to install UNR for Windows and Linux users…

win32imagewriter

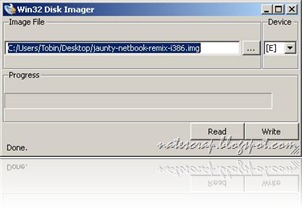
The remix is bundled in a .img file (a bootable/runnable Linux install package) for download, and with a simple tool (see above) can convert your USB stick to a portable OS. By tweaking and adding the img files, you can boot and run Linux in this fashion. This makes trying out Jaunty a cinch. I would check the compatibility of your model by going here first. Let’s look at the not-so-“typical” install I performed, what went wrong, and some problems for HP netbook users (some not minor).

My netbook running XP (it isn’t yet aware Linux is coming)Netbook 

The first thing to know about Linux installs is that there is a good way, and an easy way. They are not usually inclusive, in most regards. Running the installer from inside Vista is probably one of the easiest. Vista, for example has the ability to adjust it’s partitions. Not so in XP, so if your model comes loaded with it, you need to be warned that there are some re-partitioning gymnastics to perform to get it running in an optimal configuration, and they could destroy your primary XP partition and data. Most likely they won’t but you should know there is a risk. So, you have a netbook (and a Linux USB stick), you rebooted it (with your stick plugged in), and adjusted some BIOS boot settings (if required) so it would boot from the USB, and up pops the installer.

Boot1

Don’t get scared…simply pick your language, which if you can read this, might be in English. You have to pick language again once the full GUI starts (see the screen shot above for boot options). You could simply choose to test drive Jaunty at the bootloader window point, by selecting the first option at the top to try Ubuntu without installing it to your computer. It will simply run from the stick, however this is not optimal for long-term usage. You might want to do this anyway the first time you boot into the installer, as you will likely want to adjust, re-format existing, or format any new drives. Ubuntu does not handle this very well if you let it pick these settings for you, especially the “run Windows side-by-side” option (see the section on dual-boot below). Ubuntu will require a few more setup steps like time zone, and keyboard localization settings to be entered if you are continuing with the installer at this point (die-hard Ubuntu types, that means you).

Boot2

Boot3

So, the install will want some disk partitions to be configured or it will configure them for you. You could simply let Ubuntu use your whole disk for instance, which is very easy to get up and running with no fuss. If you plan on running only Ubuntu, then this becomes even easier. In my case, the unit came with XP installed, but with a single 110GB XP hard disk partition across the whole disk, which is just stupid. Why would you have a single giant hard drive, when you can do so much more with several smaller chunks of storage (like install Linux and XP)?

Screenshot--GParted

Luckily, the USB run-time version of Ubuntu also includes the GParted disk partition editor (shown above), so that’s why I said many XP users might want to boot into it the first time. Whether you are installing Ubuntu by itself or with another operating system, I recommend that you choose the manual method of entering partitions (advanced). It’s the bottom-most option in the “Prepare disk space” screen. This is better if you wish to tweak your disk setup for good performance and best practices. Otherwise, simply let Ubuntu use the entire disk, and away you go!

HPIM0459

Minimal part settings for best practices:

  • You should create 1 10GB ext3 part for root (at least 10)
  • You should create a linux-swap partition at least as big as the amount of memory you have installed (2G in my case)
  • *You might want to create a third part for home directories if you having a lot of users and want to keep documents there and separate from the OS.

*Note: This is optional in my opinion, as I usually create a large NTFS or FAT32 part for external files somewhere else (so both Windows and Ubuntu can share access to it). Better yet, you could store your data on an external storage medium. The user profiles are still on root, but your docs and such are safe on the second drive.

After creating the parts you need, you then assign the various mounts to your new partitions (root goes in the 10GB part, swap in the smaller part, etc), continue the installer.

HPIM0463 Complete a few remaining setup/config questions (login, etc.) and you are finished! Ubuntu should start up! If you run the installer version again (or go into synaptic and load the gparted program on your fresh install), you can see your parts there. See the screenshot above of my partition setup for reference--ignore the additional ext3/swap parts at the very end of the disk, as the automated installer stupidly created them during a previous build attempt, and I haven’t got round to cleaning them up.

Dual-Boot Configuration with XP

HPIM0489

The easiest method for a dual-boot system (one whereby you can boot either into Linux or XP) is to install XP first. First thing is to clean up the XP part in question by doing a defrag and chkdsk /f (maybe even 2X for the chkdsk) to make sure it is clean. The GParted utility will not let you do anything to the partition until it is in a verifiably non-corrupt state. After this, you will need to boot back into the USB Linux run-time. Find the partition editor under the Administration menu. Looks like the picture of a disk…see below

HPIM0478

By this time, you will be noticing that Ubuntu Linux (whether run from USB or local HD) is dog-poop slow. You press a button and literally wait for 2 minutes. It’s the semi-useful netboot interface you see pictured above. There is a problem with this build that majorly affects the HP mini 2133’s performance. It has been noted by the developer team. A workaround is to simply go into Preferences, scroll painfully to the bottom and run the “switch desktop mode” to turn it off. This takes you back to the typical gnome desktop, which I like better anyway, and returns your netbook back to the snappy performer that you would expect of Linux.

For dual-boot partitioning, you follow the same guidelines as described above for creating partitions except this time, we have to do some surgery on any XP parts that have been obnoxiously installed at the factory. GParted can shrink them down for you (if they are clean). Note the dev/sda1 ntfs partition below (it once took up the whole disk). I was able to shrink it to less than half it’s initial size quite easily. Then I created my root and swap (dev/sda3 and 4) and executed the Installer to use my new parts (which you can also do at any time from the USB live mode).

Screenshot--GParted

You probably noted the 2 tiny parts at the end of the disk above. Well initially I thought I would get cute and after shrinking my XP part, went straight back into the installer and allowed it to then “automagically” install Ubuntu along with XP for me (without first creating the proper linux parts). The result was it expanded XP to fill all but the last couple of GB of space, and then added a tiny 2.5 GB part at the end for Linux. Not only is this not optimal (performance is the worst at the very end of a disk), it means that you cannot add any programs for lack of space. It is the worst way to install Ubuntu in a dual boot configuration, in case you were wondering about simply letting Ubuntu do this on it’s own. So I went back and re-installed again using the manual method described above.

My Gnome desktop…gpart (1)And now I have a powerful new OS up and running on my netbook, and if I need XP, it’s only a reboot away…

HPIM0487

This is by no means a comprehensive discussion on disk partitioning or install topics concerning Linux/XP, but a simple example. Much better versions of all that stuff is available on the internet, so go check it out and make sure to RTFM before asking a geek or posting to the forums, okay? Next time, I’ll talk some more on ways to enhance your Ubuntu netbook experience, and more issues to look out for.

Thursday, March 12, 2009

Icecasting with Ubuntu and Radio Shark

Lately, I've really been geeking out on Ubuntu and a radio tuner device my kids bought me last year called a Radio Shark. This is the 3rd installment of a series of tutorials on how to get the Radio Shark to function in Ubuntu Linux. The device was actually designed for MAC and Windows, but some serious Linux users have found ways to make it work with Linux. In my endeavors to get Ubuntu at least as functional as Windows on my dual-boot laptop, I've included these instructions in case anyone else out there is trying to similarly get all their devices working. To learn the basics of getting RS to play and record, see my last 2 posts. This post will be a little more advanced, in that we will set up Ubuntu to stream the RS output on the web as an audio stream. Yeah, cool eh? Stream your favorite local radio station to anywhere on the net...

**Updated March 23, 2009 for iPhone/iPod player info...see below

First, check out the previous 2 posts, here and here, to get the background needed to get RS functional in Ubuntu (at least enough to play). If you just want a quick tutorial on streaming via icecast and darkice in Ubuntu, you could use this as a quick guide, but there's a ton better on the web (i.e. search for "how to use icecast").

Step 1: Open Synaptic Manager in Ubuntu and do a search for "icecast"


Select icecast2, and darkice packages and accept all supporting files when Synaptic auto-adds the required files, and then install them.

Step 2: Setup icecast.xml (/etc/icecast.xml), by opening in your favorite editor. It's important to configure all the authentication sections, especially the default passwords that are all set to "hackme". You also need to set your actual <hostname> value to your computer name. See some examples below:

<authentication>
<!-- Sources log in with username 'source' -->
<source-password>SomePassword</source-password>
<!-- Relays log in username 'relay' -->
<relay-password>SomePassword</relay-password>

<!-- Admin logs in with the username given below -->
<admin-user>Barney</admin-user>
<admin-password>SomePassword</admin-password>
</authentication>


Step 3: Setup darkice. Touch a file into the /etc directory called darkice.cfg, and edit the values for your configuration. I provided an example of mine below:

[general]
duration = 0
bufferSecs = 5
reconnect = yes

[input]
device = /dev/dsp1
sampleRate = 22050
bitsPerSample = 16
channel = 2

[icecast2-0]
bitrateMode = vbr
format = vorbis
bitrate = 32
quality = 0.8
server = localhost
port = 8000
password = Somepassword
mountPoint = example-complex.ogg
name = The Eagle
description = Classic Rock
url = http://home-laptop
genre = misc
public = yes

Step 4: Tune the radio shark, start icecast2 and darkice. In the terminal console enter the following commands (or add a bash script that does this):

$ sudo shark -fm 106.9
$ sudo /etc/init.d/icecast2 start
$ sudo /usr/bin/darkice -c /etc/darkice.cfg


In my case, I tweaked the earlier posted FMstart script and launcher shortcut to include the streaming commands instead. You could also simply initialize the icecast service on startup, run your script, or use cron to execute your scripts at preset times to play, stream or record when you like.


Step 5: Check that icecast/darkice is presenting your stream by navigating to your server's address using Firefox: http://localhost:8000. You can also monitor your streams/listeners here...


Step 6: Allow Clients to access your streaming server

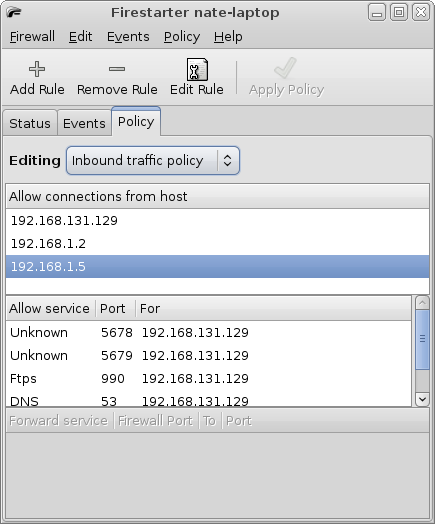
NOTE: In this example, I provide a simple way to stream music on your home network. It could work similarly on a front-facing internet server, but I do not include the specific steps to do this. Properly configuring firewalls in Linux is well beyond the scope of this writeup, especially to protect resources on the internet. If you run the built-in Ubuntu firewall (iptables), you can use "firestarter" GUI to tweak it to allow it to allow local traffic easily, otherwise your clients will likely not see the stream.


I simply set it to allow clients on my home network (192.168.1.0 private network address), but a more involved configuration is required if you use, for instance, NAT (network address translation) to protect your internal addresses and wish the streams to be allowed across the internet. You could allow incoming connections to port 8000, for example, but you should consult security documentation thoroughly to understand the risks of exposing any home computers to outside users in this manner.

Step 7: Play back your streams. In my case, I used the excellent, free TCPMP (The Core Pocket Media Player...Windows versions of this great A/V player are also available) running on my Windows Mobile device, as I find it plays almost any type of media. In this case, the stream is formatted as ogg-vorbis--and presented as a SHOUTcast stream--not every player can natively play this kind of stream. Tuning in should be as easy as connecting to your home network via Wifi and inputting the full URL into your player...i.e. http://yourserver:8000/example-complex.ogg


Supprted players include (from the icecast homepage) below. To learn more about icecast and darkice go here and here...
foobar2000 (mp3 + ogg vorbis) Windows 98/NT/2000/XP http://www.foobar2000.org
winamp 2.x, 5.x (Not 3.x)(mp3 + ogg vorbis) Windows 98/NT/2000/XP http://www.winamp.com
XMMS(mp3 + ogg vorbis) Unix http://www.xmms.org
Zinf(mp3 + ogg vorbis) Unix/Windows http://zinf.sourceforge.net
MPlayer Windows 98/NT/2000/XP Unix Mac OSX http://www.mplayerhq.hu
Xine Unix http://www.xinehq.de
VLC Windows 98/NT/2000/XP Unix Mac OSX http://www.videolan.org

In an earlier post, I admitted that I didn't yet have an elegant method to time-shift the RS using Ubuntu, but using icecast/darkice to stream does allow you to control this in a similar fashion. In TCPMP, for example, you can pause the live stream for several minutes, like say during commercials, so that you lag the live radio trasmission. You could then fast forward through that section until you have again caught up to live input again. It's not as nifty as the Windows software capability that comes with the RS, but it serves. Well, that's pretty much it for Radio Shark and Ubuntu for now. Next time, I hope to have worked out an effective scripting method for doing real time-shifting, so be sure to check back again.

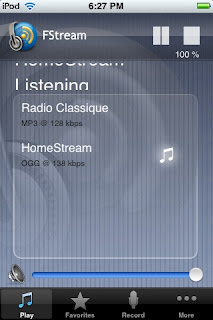
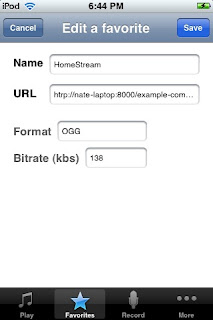
Actually I discovered a player for iPhone/iPod Touch that will play SHOUTcast streams, and works quite nicely with this setup called FStream. You can download and use it for free by searching for the name in iTunes or the device App store. Once installed, simply add your URL stream as a favorite, and select that stream in the main screen to play. You can tweak a setting that will allow you to time-shift when pausing just as with TCPMP mentioned above (look in the More menu). You can also record streams with this tool.


Credits:

Sources (Bibliography/credits):

How-to stream cast with RS by Javier Rodriguez: http://javier.rodriguez.org.mx/index.php/2006/06/10/griffin-radio-shark-icecast2-on-debian-gnulinux

How-to Play RS on Deb Linux by Javier Rodriguez: http://javier.rodriguez.org.mx/index.php/2007/05/20/use-the-radioshark-2-under-linux-shark2c

New RS 2 code by Hisaaki Shibata (on Javier’s site): http://javier.rodriguez.org.mx/code/shark2.c

Original RS Linux how-to and shark.c: http://wiki.linuxquestions.org/wiki/Audio …code by Michael Rolig

Good example of using Linux to record, play and time-shift using RS: http://whats.all.this.brouhaha.com/2006/01/18/radioshark-in-linux/

Web-site that allows you to control a real live RS tuner over the net: http://www.radioyakima.com/index.php

Friday, February 06, 2009

Record and Play from Radio Shark in Ubuntu Update


I found that there are actually easier ways to play (and record) music from the Radio Shark 2 in Ubuntu (versus using ecasound...see the full previous post here). You can use arecord/aplay (built-in command-line sound programs in Linux). You will still have to follow the previous instructions on installing libhid. To use arecord/aplay, open a terminal as described in the previous post, and enter the following:

$ arecord -c 2 -f dat -D hw:1,0 | aplay -D hw:0,0

Record 2 channels using "dat" format from Radio Shark, and then send the recorded output to aplay via your PC sound card (so you can actually hear it).

You can also wish to simply record directly to a file for later consumption, so you can do this instead:

$ arecord -c 2 -f dat -D hw:1,0 foo.wav

This says to record as before, but to a .wav file called "foo"

Then play the file using aplay:

$ aplay foo.wav

To record to an mp3 file directly, you need to install lame (see instructions in previous post on how to install using Synaptic). Search for "lame" in the package manager to find and install. Then you can use the following command to directly record to mp3.

$ arecord -c 2 -f dat -D hw:1,0 | lame - sample.mp3

Same as above except the "|" (known in UNIX parlance as a pipe) now "pipes" the arecord output to lame, which reads from standard in (in this case the previous command's output) and converts/stores the audio stream into an mp3.

So you can replace the ecasound command in the previously posted bash script with the ones above you would like to use instead. Maybe have 2 bash scripts; one for recording and the other for simple playback.

You will notice that you can't do real-time audio shifting and simultaneous recording using only the methods I have posted here. This is a hangup if you really want to use the Shark to make your own mp3s quickly and easily. I must recommend the Windows version for that, as the time-shifting features allow you to go back to a point in the broadcast where, say, a song starts, and then start recording from there. You can also listen while recording and stop it when the song ends, but even the Windows option is not as easy as it once was. The excellent SnapTune service is no longer available, which could automatically tag and save the songs from the radio stream (into mp3s). Still, it is progress for Linux users who might have an RS 2, and don't need another paperweight on their desk. For instance, if you want to record talk radio programs (instead of songs), then you can easily set up a cron job in Unix to start/stop your scripts at preset times/days, but this is getting into more advanced topics. Stay tuned for the next post. Now that we can at least play, and record using RS and Linux, I will post on what else there might be for this cool audio gadget.


Saturday, January 17, 2009

Radio Shark 2 running on Intrepid Ibex

UBsharkNew Ubuntu Linux has become my current hobby shop. I finally concentrated on fixing some of the more egregious problems I’ve been having with the latest Ubuntu stable release (playing DVDs and music). So now, after much tweaking, I finally have gotten my Radio Shark 2 AM/FM tuner to play in Linux on my laptop, though it was not exactly simple to track down all the required and various information. I figured after all the rabbit holes I went down (like compiling libhid from scratch) to get this to work, it might help to have an updated one-stop for the next poor sot, so I created this “kind of” simple how-to to get your RS2 at least to play in Ubuntu Intrepid. I’ll follow it up with a second post on some more advanced things you can do, like stream radio on your home network. Some very simple compiling of source code is involved and I added basic bash scripts at the end to start up the Radio Shark application. If you follow the step-by-step, it shouldn’t be a big deal (even for a relative noob). There are some cool things I learned in the process. If you are wondering why you would want to play live radio through your computer, read this. Say you want to make decent quality CDs/mp3s of the local classic rock station? I might know someone who has a collection of several hundred songs ripped to an iPod that was recorded this way—uh not me, of course. The powers that be might decide that radio is also copyright protected, and send out the black helicopters…

RSappWin It is the essence of true geekiness to be able to play and record radio through your computer. It gives your PC that final touch as a true media server, but it’s also useful to be able to stream live radio wirelessly on your home network (come back for the next post, or continue to the bibliography/credits at the bottom for those instructions). The standard Windows application/drivers for the RS allow you to listen/tune, time shift (like Tivo) and record live radio, which is still cool, no doubt (yawn), but check out this web-site to see what you could do with a radio tuner, and a computer…uh huh—geeks started their own home-grown internet radio station with a web server, some flash and a sprinkling of PHP. Now what you got to say, huh!? You can also do twisted stuff like make the shark’s lights change colors (living on the edge now, eh?) I’ll provide some links of places where you might find a Radio Shark. In this first post, I’m just going over the steps to allow you to play and change the stations, etc.

ubuntulogo

1. First, you need Ubuntu Linux on your computer. If you have Windows, it’s really quite easy to install Intrepid as a second boot option by following the install wizard. Read this for a very simple example, or do a search on-line for “Install Ubuntu”. Linux can be a pain, but it starts/runs/stops faster than Windows Vista. If you simply want to record/listen to music, the RS tuners come with Windows applications included that do this already (Windows users can stop reading now).

2. Second, you need a radio tuner device. In my case, I used the Radio Shark 2, (kids got mine at ThinkGeek.com). The RS is an external USB attached AM/FM tuner. I should think you could do this with other tuner devices, but will likely require you to customize or write new code.

3. Connect the Radio Shark with Linux running. (Open a terminal console (Under Applications >> Accessories) and type “dmesg” to view system log messages. You should see something like below indicating that the RS is connected to your computer and Linux isn’t throwing a fit:

dmesg log trace…

[ 296.877223] input: Griffin Technology, Inc. radioSHARK as /devices/pci0000:00/0000:00:1d.7/usb5/5-4/5-4.2/5-4.2:1.2/input/input13
[ 296.893339] input,hidraw2: USB HID v1.00 Device [Griffin Technology, Inc. radioSHARK] on usb-0000:00:1d.7-4.2
[ 297.157074] usbcore: registered new interface driver snd-usb-audio

Download, Install and configure the code:

Screenshot-Software Sources

4. Open Synaptic Package Manager (System >> Administration >> Synaptic…), and make sure the “universe/multiverse “ repositories are available (see above). Enable them, if need be--the extra goodies make Linux truly excellent--under “Settings” >> “Repositories”… Go here to learn more about Synaptic, which will make Add/Remove in Windows look like a bad joke.

Screenshot-Synaptic Package Manager 5. You will need the libhid development library, so do a quick search for libhid (search box is at the top of Synaptic), and the manager will reveal those packages (libhid-dev and libhid0). Don’t be intimidated just because it’s called a “library”—Synaptic does all the heavy lifting—it’s point and click just like Windows!

6. Select and install libhid packages (your source code will not compile without these). Synaptic will download and ask you to select required packages. Go have a tea…depending on you network speed.
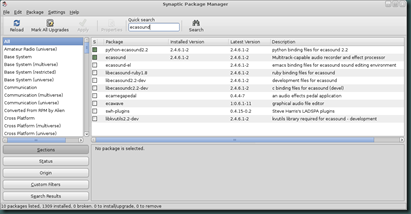
Screenshot-Synaptic Package Manager -1 7. You will also need the program ecasound (also search the repository and repeat as you did for the libhid). This is the actual player program that I used. Go have another tea…

8. Download shark2.c from here. When it finishes, it will probably be downloaded to your user home directory under “Downloads” by default (in Firefox). The shark program allows you to change bands/tune the RS, and control the lights on the side.

9. In the console window you previously opened, type the following (followed by the enter key after each line):

# cd ~username/Downloads

…change directory to wherever you downloaded the source. Replace “username” with your username of course…

# sudo gcc -g -o shark -lhid shark2.c

…compile shark2.c! gcc stands for gnu compiler collection… You are now only like “this” far away from being a coder yourself (if “this” was years and years of experience writing computer programs, haha…)! When some uber-geek sneers at you, just say…”Lay off dude… I’ve compiled code before”

# sudo cp shark /usr/local/bin

…copy the code to the local user executable directory. This is mainly so that you AND your dog can now run the new shark program.

# sudo /usr/local/bin/shark –blue 60

…change the color of the lights to test if the code is working.

# sudo /usr/local/bin/shark –fm 106.9

Tune the shark to a local FM station in your area (106.9 is classic rock station near me). Cool, now we want it to actually make the radio play, right?

Running ecasound to play the RS:
Screenshot-Terminal

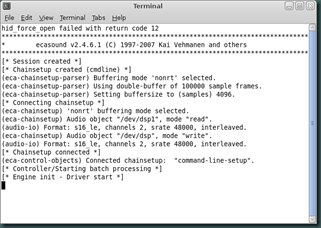
10. This part is a little more complicated. Like your new shark program, ecasound runs from the command line. So you could just pound in the word ecasound at your terminal console like the previous commands, but WAIT just a minute. You have to give it some extra input parameters. Oh my God! What in the seven hells are “input parameters”, you say!? Nothing big, just extra config information/instructions for the program when it starts up is all. You were already using them in the previous commands for gcc, shark, etc.

11. Type this next command instead (some tweaking may be required):

# ecasound -D -f:s16_le,2ch,48000,inter-leaved -i:/dev/dsp1 -o:/dev/dsp -B:nonrt -z:db -b:4096

This tells ecasound to run with debug on and specifies the sound IO device and buffer settings. Mainly, you want to focus on the sample rate of 48000, and tweak this for better performance or sound quality (and maybe if you have issues). I've seen that other users have successfully used 6400, 8000, and 32000 as well. The higher the sample rate, the better the audio quality that is produced. My RS made a pretty nasty sound at 8000. 48000 sounded great for FM playback.

Automating your Radio Shark in Ubuntu
12. While you could continue to run programs and control devices using old-fashioned command prompts, you might want to take advantage of the more automated capabilities of having a modern computer. So, make a script and a shortcut to easily execute your Radio Shark commands from the Gnome Application Launcher. I like to use VI editor for basic file editing, but you can use your favorite text editor (say gedit which is like notepad). First create a launcher script and then some change station scripts. Use your Terminal console again:

# cd /usr/local/bin
# sudo touch FMstart FMST1

..creates the empty script files..you can create more for fav stations like FMST2, FMST3... etc.

# sudo chmod 755 FM*

..makes them executable so users like you AND your dog can run them

Script contents:

Navigate using Gnome file browser to /usr/local/bin. Save these script contents in the files that you created earlier. Open the files with your editor:

FMstart:
#!/bin/bash
#first line says I'm a bash script
#Second sets RS with my favorite station
#Third turns on the sound and then exits when you stop it
sudo shark -fm 106.9
ecasound -D -f:s16_le,2ch,48000,inter-leaved -i:/dev/dsp1 -o:/dev/dsp -B:nonrt -z:db -b:4096
exit 0

FMSTN1 (change the freq to a local one in your area):
#!/bin/bash
shark -fm 106.9
exit

Full list of shark commands:
-fm <freqeuncy> : set FM frequency, e.g. '-fm 91.5'
-am <frequency> : set AM frequency, e.g. '-am 730'
-blue <intensity> : turn on blue LED (0-127) '-blue 127'
-red <0/1> : turn on/off red LED '-red 1'

13. Add Application shortcuts to the Gnome panel or the Programs Menu to run your new custom scripts. For instance, you can add the shortcut to the Sound and Video category under the main Applications folder. Simply right-select the Gnome launcher (see below):
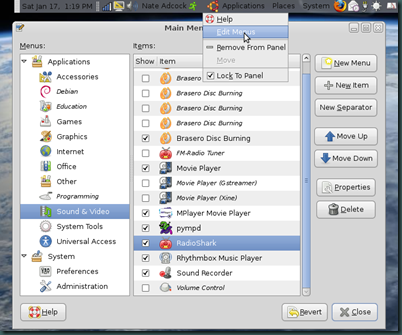
PanelEditSelect the Add new item button, and select the “Custom Application Launcher” choice at the next dialog…

Screenshot-LauncherProperties

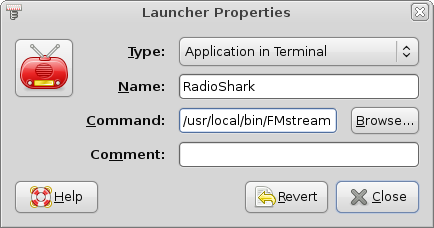
In the Launcher Property window, enter the application name you want to assign and the path to your executable script. You can also assign a suitable icon for your program.

Issues:

Make sure you go into the sound settings in Ubuntu and turn up the correct sound device to hear the radio playback. You can tweak volume levels from the main menu volume control, or by navigating again to the system settings menu. You may need to unplug and plug back in the RS, and rerun the ecasound and shark scripts if you booted with it already plugged in.

Feel free to post your comments. I added links to the source material below, and would like to hear more awesome ways you use Linux. Next post, I’ll add more RS and Ubuntu tips…

Sources (Bibliography/credits):

How-to stream cast with RS by Javier Rodriguez: http://javier.rodriguez.org.mx/index.php/2006/06/10/griffin-radio-shark-icecast2-on-debian-gnulinux

How-to Play RS on Deb Linux by Javier Rodriguez: http://javier.rodriguez.org.mx/index.php/2007/05/20/use-the-radioshark-2-under-linux-shark2c

New RS 2 code by Hisaaki Shibata (on Javier’s site): http://javier.rodriguez.org.mx/code/shark2.c

Original RS Linux how-to and shark.c: http://wiki.linuxquestions.org/wiki/Audio …code by Michael Rolig

Good example of using Linux to record, play and time-shift using RS: http://whats.all.this.brouhaha.com/2006/01/18/radioshark-in-linux/

Web-site that allows you to control a real live RS tuner over the net: http://www.radioyakima.com/index.php

Saturday, December 27, 2008

Ubuntu Part 2

Well, I've been trying to get Ubuntu (Hardy Heron) to properly display my desktop across monitors, and finally after upgrading to 8.10, called Intrepid Ibex, and updating a single line in the xorg.conf (/etc/X11) file...:

SubSection "Display"
Virtual 2720 768
EndSubSection

...it now works. The upgraded display config utility clued me in to the required resolution setting in the file (it prompted to add it when breaking the display mirror setting). Sigh...Linux gets a bit easier to use and configure. When I tried changing this in Heron, using either the conf file/utility, I usually ended up with a totally hosed display.

Display settings much simpler to tweak in Intrepid...


In a previous post, I described how I loaded Linux as a second operating environment to my laptop. It's a used Gateway Pentium dual-core machine that I bought from a co-worker last year (actually for my wife, but she doesn't use it much). Vista was getting bogged down in my opinion, so I decided to set up a dual-boot workstation with Linux. I posted about that initial experience with the intention of coming back and doing a part 2 on the more advanced options, but I have not been successful enough to warrant a part 2. I am happy with Ubuntu's overall performance, but some of the problems and detractors are really starting to fluster me:

Exhibit A: Can't get the synce or multisync modules functional with my handhelds, even after the upgrade. This might be attributable to my firewall in Ubuntu. Firewall (iptables) seems to continue to filter or at least log entries (according to dmesg) even when disabled.

Exhibit B: No handy blogging applications like Windows Live Writer. If you blog, you must get this tool, period. MS actually got this right, which is somewhat of a surprise. Oh and it's free...

Exhibhit C: Can't play DVD movies. Have tried a couple of tools (Mplayer, etc), but still no dice.

Exhibit D: Can't find a suitable driver/program for my FM radio tuner...

Issues Resolved:
1. The display problems noted above...finally
2. Internal WLAN adapter not connecting (this ate up some serious time to figure out). Turned out to be a driver/device issue that was fixed by an update as well--and by disabling an old, unused device. Of course, I had to connect via a wired network to get the update.

Note: Linux is like the weather off the coast of Alaska. If you don't like it, just wait a minute, and it will likely change. If you update it regularly (which can be done via an update manager as simple to use as Windows), there's a chance a fix has been included in the code base for what is ailing your build. The update manager will even let you upgrade your full release. For steps on upgrading from Hardy to Intrepid, check out this step-by-step here. Linux is free, but real pro technical support will cost you. You can get a lead on most problems at the community site chats, forums etc, here...

Flock Social Networking....browser?


I did find this browser called flock (flock.com). They have a distro for linux, and a plus is that you can run it straight from the uncompressed binaries (no need to install it). Just extract and execute the flock-browser executable, which also means you can download and run it from any linux-based PC, etc (like via a USB stick, etc). Flock is like Firefox, but for the blog/twitter-crazed and obsessed. It starts by gathering all your blog, and social site login information, favorite feeds, etc., and then tabulating it throughout the browser for 1-click access. It's blog information overload in a web browser. I'd rather just go to bloglines.com, myself.

Bloglines...the discriminating blogger's resource.


I grabbed flock because I wanted something that might compete with Live Writer, but quickly found the blogging tool portion to be sorely lacking. Flock requires use of a separate process to handle image uploads. Then you must manually link in your individual uploaded images by URL in the post, which is rather arcane. In fact it's downright lame, considering you can drag and drop images, text, etc right into Live Writer, and then dump it all to your blog when you publish your post. Flock had some kind of add-on to enhance this a bit, but still doesn't get the job done. My search for a decent blog tool, and the inability to at least sync my gadgets could keep me from using Ubuntu for little more than e-mail and casual surfing, so fixing those issues are my next major hurdles to overcome somehow.